
How to Put iPhone 7 into Recovery Mode
If you’re an iPhone 7 user, you may have encountered situations where your device needs to be put into recovery mode. This can happen when you want to update or restore your iOS, fix issues with your device, or even recover data from a previously backed up iPhone. In this post, we’ll guide you through the process of putting your iPhone 7 into recovery mode.
Why Put Your iPhone 7 into Recovery Mode?
Recovery mode is a special state that allows you to troubleshoot and fix common issues with your iPhone. Some reasons why you might want to put your iPhone 7 into recovery mode include:
- Updating or restoring iOS
- Fixing issues with your device, such as connectivity problems or frozen screens
- Recovering data from a previously backed up iPhone
- Downgrading to an earlier version of iOS (if possible)
How to Put Your iPhone 7 into Recovery Mode
To put your iPhone 7 into recovery mode, follow these steps:
- Connect your iPhone 7 to a computer**: Using a USB cable, connect your iPhone 7 to a computer that has iTunes installed.
- Open iTunes**: Open the iTunes app on your computer. If you don’t have iTunes installed, you can download it from Apple’s website [1].
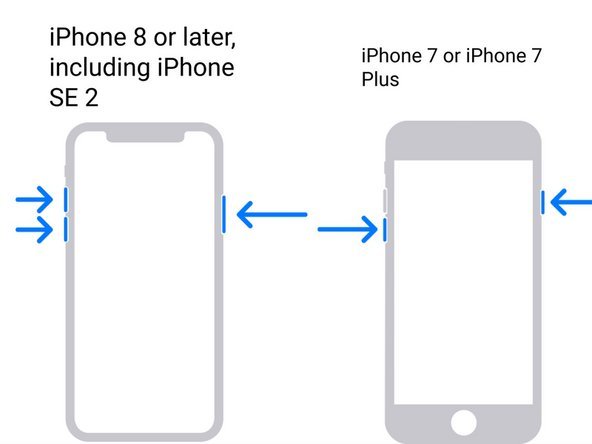
- Put your iPhone 7 into recovery mode**: Press and hold the Sleep/Wake button and the Volume Down button at the same time for about 10 seconds. You’ll see a screen that says “Connect to iTunes.”
- Release the buttons**: Release the buttons when you see the “Connect to iTunes” screen.
- iTunes will detect your iPhone 7 in recovery mode**: If everything is set up correctly, iTunes should detect your iPhone 7 in recovery mode. You’ll see a prompt that says “iPhone [your device name] has been put into recovery mode.”
Tips and Considerations
Here are some tips and considerations to keep in mind when putting your iPhone 7 into recovery mode:
- Making sure your iPhone 7 is fully charged or plugged in**: Before putting your iPhone 7 into recovery mode, make sure it’s either fully charged or connected to a power source. This will ensure that your device doesn’t run out of battery during the process.
- Using the correct USB cable and port**: Use the original USB cable that came with your iPhone 7, and plug it into a high-speed USB port on your computer (preferably one that’s not being used by another device).
- Avoiding data loss**: When putting your iPhone 7 into recovery mode, make sure to back up your data regularly to avoid losing important information.
Conclusion
Putting your iPhone 7 into recovery mode can be a lifesaver when you’re facing issues with your device. By following the steps outlined in this post, you’ll be able to troubleshoot and fix common problems with your iPhone. Remember to always back up your data regularly and use the correct USB cable and port to avoid any potential issues.
References:
- [1] Apple – iTunes Download
EasyAcc 20000mAh Rugged Outdoor Power Bank: Gear up for your outdoor adventures with this rugged power bank! With its massive capacity and weather-resistant design, you’ll never run out of juice when exploring the great outdoors.
Black Friday OLED TV Deals 2021: Are you ready to upgrade your home entertainment system? Check out these amazing Black Friday deals on OLED TVs and enjoy crystal-clear picture quality, vibrant colors, and unparalleled viewing experience!


